Using Your Android Phone as a Server (2026 Guide)
This was a weekend experiment where I didn't want to pay cloud charges (at least not for hosting small projects and demos). That's when I stumbled upon Termux, and it turned my Android phone into a usable mini-server.
This guide is updated for 2026 and avoids outdated practices.
What This Blog Covers
- Using your Android phone like a Linux server
- SSH access from your PC
- Running backend services (Node.js example)
- Exposing services securely (Cloudflare Tunnel)
- With domain and without domain approaches
- Optional: full Linux (Debian / Ubuntu) environment
Why Use a Phone as a Server?
- Why pay cloud charges for small experiments?
- Learn real DevOps concepts (SSH, networking, tunnels)
- Repurpose an old or spare phone
- No port forwarding required
- Works even behind CGNAT
- Perfect for demos, side projects, and learning
This is not a production replacement, but it's good for learning and prototyping.

Prerequisites
You'll need:
- Android phone (Android 8+ recommended)
- Stable internet (Wi-Fi preferred)
- PC (Windows / Linux / macOS)
- Basic terminal knowledge
- Optional: a domain name
Step 1: Install Termux (Correct Way)
Termux provides a Linux-like environment on Android.
Do not install Termux from the Play Store (deprecated).
Install from F-Droid
- Download Termux from F-Droid: https://f-droid.org/en/packages/com.termux/
After opening Termux, update packages:
pkg update && pkg upgrade
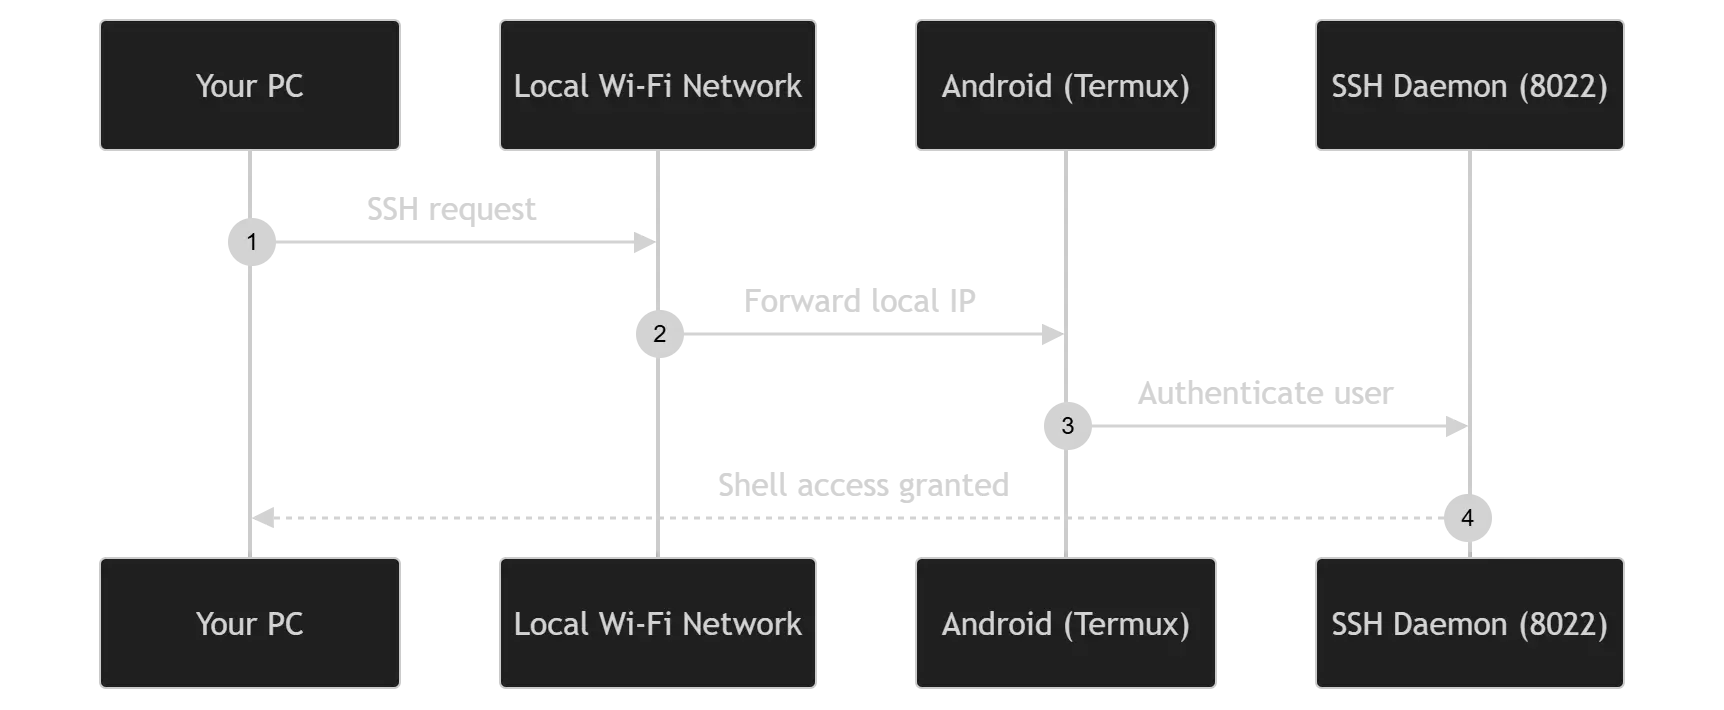
Step 2: Prepare Your Phone for SSH Access
Typing commands on a phone is painful. Instead, we'll SSH into the phone from a PC.
Install OpenSSH
pkg install openssh
Set a password
passwd
Start the SSH server
sshd
- SSH runs on port 8022 by default
Check your Termux username:
whoami
Find your phone's local IP
ip addr show wlan0
Example:
192.168.1.23
Step 3: SSH Into Your Phone From PC
From Linux / macOS / Windows:
ssh -p 8022 <username>@192.168.1.23
Enter the password you set earlier.
You now have remote shell access to your phone. If not, you messed something up, it's time to GPT your way out.
Step 4: Run a Backend Service (Node.js Example)
Let's run a simple HTTP server.
Install Node.js
pkg install nodejs
Create a test server
mkdir test-server
cd test-server
nano server.js
const http = require("http");
const PORT = 3000;
http.createServer((req, res) => {
  res.writeHead(200, { "Content-Type": "text/plain" });
  res.end("Server running on an Android phone\n");
}).listen(PORT, "127.0.0.1", () => {
  console.log("Server listening on port " + PORT);
});
Run it:
node server.js
Your phone is now acting as a local backend server.
Step 5: Why Public Access Is Not Straightforward
Most mobile networks:
- Use CGNAT
- Block inbound connections
- Do not allow port forwarding
So direct exposure using public IP will not work.
Solution: Cloudflare Tunnel
Cloudflare Tunnel creates a secure outbound tunnel from your phone to Cloudflare. No public IP, no router configuration, HTTPS by default.

Step 6: Install Cloudflared
pkg install cloudflared
Step 7A: If You HAVE a Domain (Recommended)
Important Note About Domains
If your domain is registered with providers like Namecheap, GoDaddy, Google Domains, etc.:
- You must move your domain's DNS to Cloudflare
- This does not mean transferring ownership
- Only nameservers are changed
Cloudflare Tunnel requires Cloudflare DNS to work with custom domains.
Login to Cloudflare
cloudflared tunnel login
This opens a browser where you:
- Log in to Cloudflare
- Select your domain
- Authorize access
Create a tunnel
cloudflared tunnel create test-server
Create configuration file
mkdir -p ~/.cloudflared
nano ~/.cloudflared/config.yml
tunnel: <TUNNEL_ID>
credentials-file: ~/.cloudflared/<TUNNEL_ID>.json

ingress:
  - hostname: test.yourdomain.com
    service: http://localhost:3000
  - service: http_status:404
Map DNS automatically
cloudflared tunnel route dns test-server test.yourdomain.com
Run the tunnel
cloudflared tunnel run test-server
Now open:
https://test.yourdomain.com
Your phone is live on the internet with HTTPS.
Step 7B: If You DO NOT Have a Domain
You can still expose your service using a temporary Cloudflare URL.
Run:
cloudflared tunnel --url http://localhost:3000
You'll get a URL like:
https://random-name.trycloudflare.com
Characteristics:
- No domain needed
- HTTPS enabled
- Temporary
- URL changes on restart
Perfect for demos and quick testing.
Step 8: (Optional) Get a Full Linux Feel (Debian / Ubuntu)
If Termux feels limited and you want a real Linux filesystem and package ecosystem, you can use proot.
Install proot-distro
pkg install proot-distro
Install Debian (recommended)
proot-distro install debian
Login:
proot-distro login debian
You now have:
aptpackage manager- Standard Linux directory structure
- Near VPS-like experience
You can also install Ubuntu:
proot-distro install ubuntu
proot-distro login ubuntu
This is ideal if:
- You want parity with cloud servers
- You're testing deployment scripts
- You want a true Linux dev environment
Step 9: Power & Stability Tips
- Disable battery optimization for Termux
- Keep phone plugged in
- Use
tmuxfor long-running processes - Expect occasional restarts (it's still a phone)
Security Notes
- Prefer SSH keys over passwords
- Never expose SSH directly to the internet
- Cloudflare Tunnel is safer than port forwarding
- Avoid storing sensitive secrets on the phone
Final Thoughts
Your phone is more powerful than many old VPS machines.
With Termux + SSH + Cloudflare Tunnel, you can:
- Treat your phone like a Linux server
- Learn real-world networking
- Host side projects without paying cloud bills
Sometimes, the best lab is already in your pocket.
References
End of file.